Nearly everyone wants their data in “real-time.” Until recently, getting real-time data involved complex and expensive data pipelines. Most people opt for either batch or micro-batch loading of their data — content with five- to ten-minute refreshes — when faced with the costs and complexities.
We’re happy to share that Snowflake just flipped the script on real-time data ingestion with the release of Snowpipe Streaming. In this post, you’ll learn how to set up your demo of Snowpipe Streaming, so you can experience how easy it is to ingest real-time data into Snowflake.
Data Loading Methods
Snowflake provides numerous methods for ingesting data. All except Snowpipe Streaming rely upon files written to either internal or external stages. The data from those files are loaded into your Snowflake tables. In contrast, the Snowpipe Streaming API writes rows of data directly to tables. This results in lower storage costs, faster load times, and faster time to insights.
Snowpipe Streaming is a more efficient way to load data into Snowflake, especially if you are loading data from streaming sources. There are no stages or integrations to set up or cloud storage notifications. All the information you need is in a single configuration file.
Before We Begin
Many of you reading this are likely competent developers and quite comfortable in the terminal. However, I will be specific in these instructions to ensure you don’t get stuck. In addition, I want to demonstrate the sheer ease of Snowflake Snowpipe implementation. Anyone can be up and running with this demo in under 30 minutes.
These instructions are for Mac developers. If you’re developing on a Linux or Windows machine, you’ll need to make some minor alterations.
Also, sign up for a free trial of Snowflake here to make things easy for you. Any cloud provider and region will do, but select Enterprise edition.
Okay, let’s get started!
Let’s Stream It!
Snowpipe Streaming is a set of APIs for the Snowflake Ingest SDK, and there are essentially two ways to implement them:
- Use a custom Java application
- Leverage the Snowflake Connector for Kafka
We will use the Snowflake Connector for Kafka, so we don’t have to create a custom app. All Snowpipe Streaming API routines are packaged inside the connector, making it easy to start quickly. In addition to the connector for Kafka, we’ll need Kafka itself to create and publish our topics and a runtime version of Java. Don’t worry if you don’t have these already. I’ll walk you through everything.
Step 1
We’ll need an RSA key so Kafka can authenticate into Snowflake. Navigate to where you store your RSA keys (I keep mine in the ~/.ssh folder):
cd ~/.ssh
I strongly encourage you to create an encrypted RSA key. Unfortunately, the SDK doesn’t support encrypted private keys right now. I fully expect Snowflake to support encrypted private keys in the future.
Enter the following command to create an unencrypted private RSA key named rsa_key.p8:
openssl genrsa 2048 | openssl pkcs8 -topk8 -inform PEM -out rsa_key.p8 -nocrypt
Enter the following command to create a public key from your private key:
openssl rsa -in rsa_key.p8 -pubout -out rsa_key.pub
Enter the following command to ensure you don’t inadvertently change your private key:
chmod 400 rsa_key.p8
Remember where you put these keys. We’re going to need them later.
Step 2
We will use the Java Development Kit since it has a runtime version of Java in it. The easiest way to install it is to use Homebrew. If you don’t have Homebrew, run this curl command:
/bin/bash -c “$(curl -fsSL https://raw.githubusercontent.com/Homebrew/install/HEAD/install.sh)”
Then you can install the Java SDK:
brew install openjdk@11
There are later versions of OpenJDK, but this one is tested, tried, and true.
After OpenJDK is installed, several helpful messages will appear at the end. In particular, you want to make sure your machine can find OpenJDK. Use the following commands:
export PATH=”/usr/local/opt/openjdk@11/bin:$PATH”
export CPPFLAGS=”-I/usr/local/opt/openjdk@11/include”
After that, restart your terminal so everything gets loaded correctly.
Step 3
Now, we’ll install Kafka. The easiest way is to curl the tar from Apache and unzip it. I recommend running the following commands from your home directory:
curl https://archive.apache.org/dist/kafka/3.3.1/kafka_2.13-3.3.1.tgz –output kafka_2.13-3.3.1.tgz
tar -xzf kafka_2.13-3.3.1.tgz
Step 4
Download the Snowflake Kafka Connector into the kafka_2.13-3.3.1/libs folder:
cd kafka_2.13-3.3.1/libs
curl https://repo1.maven.org/maven2/com/snowflake/snowflake-kafka-connector/1.9.1/snowflake-kafka-connector-1.9.1.jar –output snowflake-kafka-connector-1.9.1.jar
Step 5
We’ll need a configuration file for the Kafka connector. Grab this template and paste it into your text editor:
name=snowpipe_streaming_ingest
connector.class=com.snowflake.kafka.connector.SnowflakeSinkConnector
tasks.max=1
topics=customer_data_topic
snowflake.topic2table.map=customer_data_topic:customer_data_stream
buffer.count.records=1
buffer.flush.time=10
buffer.size.bytes=20000000
snowflake.url.name=<value_from_account_url>:443
snowflake.user.name=SNOWPIPE_STREAMING_USER
snowflake.private.key=<your private rsa key from step 1>
snowflake.database.name=KAFKA_DB
snowflake.schema.name=KAFKA_SCHEMA
snowflake.role.name=KAFKA_CONNECTOR_ROLE_1
snowflake.ingestion.method=SNOWPIPE_STREAMING
key.converter=org.apache.kafka.connect.json.JsonConverter
value.converter=org.apache.kafka.connect.json.JsonConverter
key.converter.schemas.enable=false
value.converter.schemas.enable=false
You’ll need to supply values for snowflake.url.name and snowflake.private.key.
Navigate to your Snowflake trial account, log in, and run the following commands:
use role orgadmin;
show organization accounts;
Select the URL under account_url and paste it into the template above. You don’t need the https://.
For your snowflake.private.key, open up the rsa_key.p8 file you created in Step 1. You want to grab everything between ——-BEGIN PRIVATE KEY——- and ——-END PRIVATE KEY——-. You must add all of this to the config file above as one line — no line feeds.
Save the file as SF_connect.properties in the kafka_2.13-3.3.1/config folder.
Step 6
Almost there. We just need to set up Snowflake with all the necessary objects. Log into your Snowflake account and run the following statements:
— create a database and schema
use role sysadmin;
create database kafka_db;
create schema kafka_db.kafka_schema;
— use a role that can create and manage roles and privileges.
use role securityadmin;
— create a snowflake role with the privileges to work with the connector.
create role kafka_connector_role_1;
grant role kafka_connector_role_1 to role sysadmin;
— grant privileges on the database.
grant usage on database kafka_db to role kafka_connector_role_1;
— grant privileges on the schema.
grant usage on schema kafka_db.kafka_schema to role kafka_connector_role_1;
grant create table on schema kafka_db.kafka_schema to role kafka_connector_role_1;
grant create stage on schema kafka_db.kafka_schema to role kafka_connector_role_1;
grant create pipe on schema kafka_db.kafka_schema to role kafka_connector_role_1;
Next, we’ll create a user, but we’ll first want to grab the public key we created in Step 1. So, navigate to where you saved the rsa_key.pub and open it up. Again, you want everything between ——-BEGIN PUBLIC KEY——- and ——-END PUBLIC KEY——-. Once you have that, go back to your Snowflake account and create the user:
— create a user
create user snowpipe_streaming_user
default_role = kafka_connector_role_1,
rsa_public_key=”
;
— grant the kafka_connector_role_1 role to snowpipe_streaming_user
grant role kafka_connector_role_1 to user snowpipe_streaming_user;
You can run the describe command to ensure the public key was successfully entered:
desc user snowpipe_streaming_user;
Step 7
We’re ready to fire things up! Head back to your terminal and start up Zookeeper from the kafka_2.13-3.3.1 folder:
cd ~/kafka_2.13-3.3.1
bin/zookeeper-server-start.sh config/zookeeper.properties
You’ll get a bunch of information about Zookeeper spinning up, then finally something like this:

Open a second terminal tab and start the Kafka server:
cd ~/kafka_2.13-3.3.1
bin/kafka-server-start.sh config/server.properties
Some information about the server spinning up, then this:

Open a third terminal to create a connection to Snowflake:
cd ~/kafka_2.13-3.3.1
bin/connect-standalone.sh ./config/connect-standalone.properties ./config/SF_connect.properties

Open a fourth terminal tab (last one!) and create a Kafka producer, which will allow us to manually add data to the topic:
cd ~/kafka_2.13-3.3.1
bin/kafka-console-producer.sh –topic customer_data_topic –bootstrap-server localhost:9092
Once you get a > cursor, Kafka is ready to stream data into Snowflake.
Step 8
Go back to Snowflake, and we’ll create some records to stream. Run the following statements in Snowflake:
use role accountadmin;
use warehouse compute_wh;
select
object_construct(*) as records
from
snowflake_sample_data.tpch_sf10.customer
limit 100;
This creates 100 JSON formatted records like this:
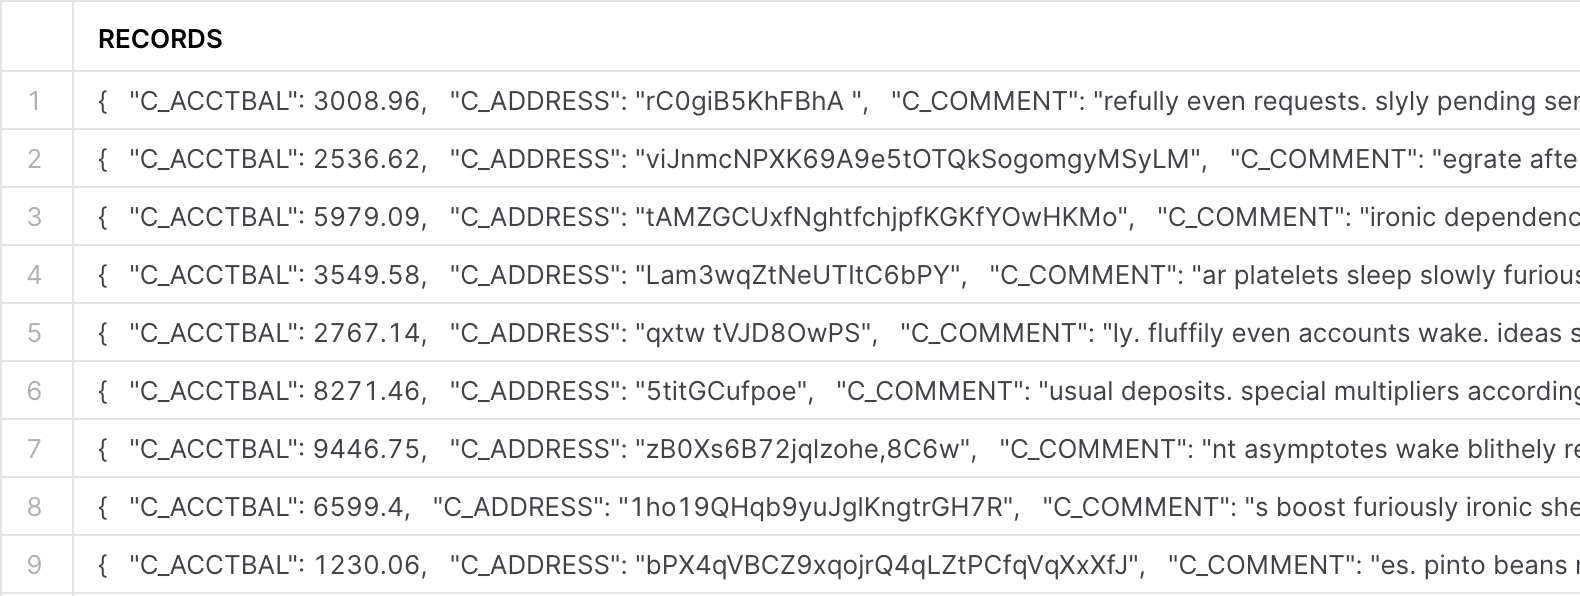
Select a few of the records and copy them to the clipboard. Don’t select the column name.
Navigate back to the fourth terminal tab and paste those records in (don’t forget to hit ENTER). If you quickly switch to the third tab where the Snowflake connection is running, you’ll see some activity as the Snowflake Kafka sink connector, utilizing Snowpipe streaming, pushes records into the target table in Snowflake.
If you navigate back to Snowflake, you’ll see a new table created in kafka_db.kafka_schema called customer_data_stream. Kafka created this table automatically based on the config file we created in Step 5.
The Kafka connector creates the table with two columns:
- record_metadata (VARIANT) – various metadata about the record
- record_content (VARIANT) – the actual payload
Run the following statement to get some ideas about how you can use these two fields in your analytics:
select
to_timestamp(to_number(record_metadata:CreateTime),3) create_timestamp
, src.record_content:C_ACCTBAL::number as c_acctbal
, src.record_content:C_NAME::string as c_nam
, src.record_content
from
kafka_db.kafka_schema.customer_data_stream src;
Copy some more records to push into the topic and play. This is the payoff for all your hard work!
Conclusion
After playing, go to each tab in your terminal and control-c to shut down the processes. You don’t need to shut them down in reverse, but you’ll avoid some angry error messages if you do.
Snowpipe Streaming is a powerful tool for loading data from streaming sources into Snowflake. The list of use cases is nearly limitless, including real-time analytics, fraud detection, customer 360s, IoT devices, and machine learning.
Of course, streaming the data into Snowflake is only the beginning. You’ll still need to prepare the data for reporting and analytics, including possible enrichment. Since introducing orchestrated transformations may add to the latency, you may want to explore views or transformations at query tools such as Looker. Another exciting option is Snowflake’s Dynamic Tables which are currently in private preview. The point is the Snowflake Data Cloud puts real-time data and analytics within reach of nearly any enterprise.
Contact us to explore how DAS42 can help resolve your complex problems with simple and innovative solutions. We are a Snowflake Elite Services Partner and winner of the 2022 Americas Innovation Partner of the Year award. We have helped all of our clients ensure they’re maximizing their tech stack with modern and effective solutions.


Services provided