Thought Leadership
Making LAMS Work For You — How to Create Customizable Rules
Nick Hyland
October 17, 2023

Reading other people’s code is hard. It can be challenging in the realm of data analytics, where an analyst’s or developer’s goal is to produce fast, actionable insights for business stakeholders. While these analysts can provide a revenue breakdown by SKU, they often prioritize speed over producing the cleanest code. For years, software developers have deployed linters to help detect bugs, maintain code cleanliness, and ensure a uniform style. Although Looker’s Content Validator excels at identifying bugs and alerting you to potential code-breaking changes, it does not prioritize code style concerns.
Style is fundamental! Even in LookML, which appears to be a straightforward configuration language— having unclear primary keys, Explores hidden in view files, and mismatched view and file names—all indicate an undisciplined codebase. Such issues can turn a developer’s life into a nightmare, so this is when Look at Me Sideways (LAMS) comes to the rescue. Developed by the experts at Looker, LAMS is a style guide and a linter designed for LookML. Like other linters and style guides, LAMS is flexible and customizable, enabling you to tailor the Looker codebase to suit your organization’s needs. In this post, I will guide you through implementing LAMS (using GitHub Actions) and demonstrate how to customize it to your needs.
Implementing LAMS
There are multiple methods to implement LAMS, but we strongly recommend using a GitHub Action (or GitLab and Azure DevOps equivalents). It is not only the simplest to configure initially but also the easiest for Looker developers to understand what is causing the linter to fail. With a GitHub Action in place, every time a user pushes a commit to GitHub, LAMS will automatically run and indicate either a passing or failing status of the linter right above the GitHub merge button.

If it does fail, the user can click on the “Details” button, where they will be shown a console output indicating what rule failed, where it failed, and why it failed.

Here is the step-by-step method of how we implement LAMS on our projects:
- Create a new branch in Looker and push it to the remote repository on GitHub.
- Go to the ‘Add File’ dropdown in GitHub and create a file in .github/workflows/ with any name you prefer ending in .yml.
- In the new .yml file, copy the following code to create the GitHub Action:

- Commit this change with a message like “Add LAMS linter to project.”
- Return to the Looker UI and refresh the page. You can now ‘Pull Remote Changes’ from your Git menu, activating the GitHub action in Looker.
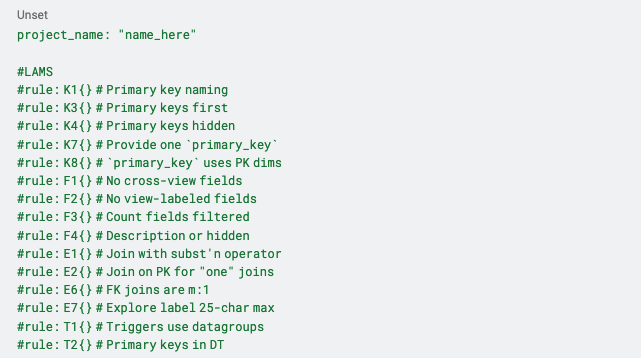
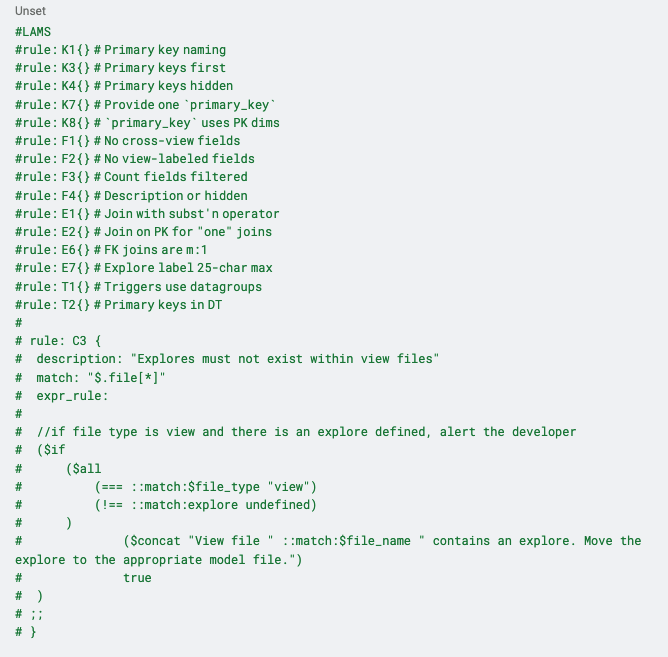
- In the Looker UI, navigate to the manifest file (if the project doesn’t have a manifest file, create one; on the first line, put project_name: “name_here”). The manifest file is where we will opt into LAMS rules and also define our custom rules. We need to start the line with a hashtag on lines where we opt into a LAMS rule or define a custom rule (“#”). Here is the list of default LAMS rules you can elect to opt into or not.
- Side note: if you’re not familiar with the Looker manifest file, it’s worth checking out; there are some cool things you can do in it (e.g., add constants).
- Save the changes, push the change, and make a pull request (PR) for the changes you made in Looker.
- Merge the PR, and your LookML linter is ready!
Creating Custom Rules
At DAS42, we’ve employed custom LAMS rules for numerous enterprise clients and within our internal Looker instance. Here is the developer workflow we’ve found to be most effective for creating new custom rules:
Downloading Your Looker Project
The first step is to download a parsed JSON version of your entire Looker project. Fortunately, much of the groundwork has already been laid with the creation of the node-lookml-parser. To achieve this, install the program, execute it within the directory containing your LookML, and then copy the generated output to your clipboard. We recommend pasting and saving this output as a text file to avoid redoing this step during development.

Using the Rule Sandbox
Once we have the JSON version of the project, we can use the LAMS Rule Sandbox to start developing new rules. You simply navigate to the sandbox, switch to the project tab, and paste the project JSON text.
Writing the Rules
LAMS custom rules leverage a JavaScript-based Lisp interpreter called Liyad. If you’re unfamiliar with Lisp-based expressions, transitioning from a data analyst’s typical workflow involving Python and SQL can be challenging. The recommended next step is to visit the LAMS GitHub page, where you can access documentation detailing how to structure custom rules.
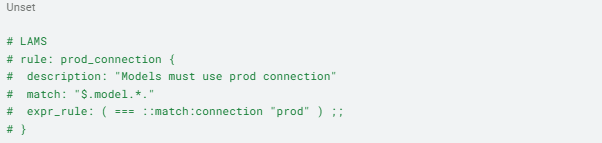
There are essentially two major components to keep in mind when creating a rule: 1) the match expression and 2) the expr_rule. The match expression “describes which LookML constructs to check.” For example, if you want to make a rule that specifies all “models must use prod(uction) connection” (as shown in the example), you would need to parse the project to return all the model objects. In this case, your match would be “$.model.*”. In a different rule, you may want to specify that all measure names should have just lowercase letters. Since you are testing the measure object, you would need to parse down the object tree to all measure objects, giving us a match expression of “$.file.*.view.*[‘measure’].*”. With this context, it’s worth returning to the big project JSON object you created in the last step to understand where everything is nested better. Then, play around with the match expression in the sandbox to see what gets returned from different expressions.
The other component is the expr_rule, which is “a Liyad expression that defines the logic of the rule.” In the example on the guide page where the rule is “models must use prod(uction) connection,” the expr_rule is ( === ::match:connection “prod”). The Liyad expression generally follows the pattern of function, first argument, second argument, third argument, and so on. In this example, our function checks for equality (“===”) then finds the connection value in the model object using the syntax of (::match:connection) and the value for comparison (“prod”). Walking through it again, we are looking to see if the value of the connection in the model object (::match:connection) is equal to (===) the string “prod.”
Here are other examples of custom rules DAS42 has written and implemented on client projects. On one project, the client wanted to ensure their developers were not creating Explores inside of view files.
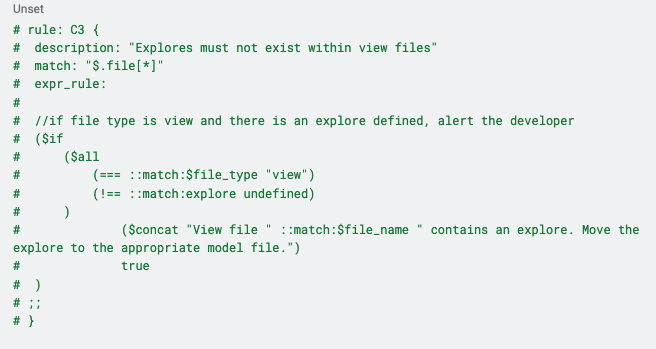
The match expression parses through all files and returns the file object. Our expr_rule then checks if the file type of the file is a view file and the Explore parameter of the view file is not undefined (meaning there is an Explore defined). If both of those conditions are met, we return a message in the linter alerting the developer that their view file contains an Explore. It may seem a little backward (“not undefined” is a double negative), but since the linter is just checking the text of the JSON object, we can rely on the undefined always to be there if the Explore doesn’t exist (whereas its value would be any word if it didn’t exist).
Adding the Rule to the Manifest file
Once you have tested the rule in the sandbox, to add it to the linter you have to copy it into your manifest underneath the rules you have opted in (remember to start the line with a hashtag “#”).
Final Thoughts
At DAS42, we are strong believers in LAMS. Whether a client wants to clean up their Looker style (do not allow capital letters in their view or file names) or provide limits to junior developers (no derived tables), we have created a repository of custom rules to meet their needs. As a free and easy-to-install open-source tool, LAMS is a great choice to consider when attempting to make your Looker instance both clean and functional.
Curious to learn how DAS42 can help you make the most of Looker? Please reach out at hello@das42.com, and we’d be happy to help!
1 The YAML file used to set up LAMS includes a section named “Get Only Edited Files.” This code checks which files on your development branch are different from those on the master branch. These files are then moved to another directory, and the linter is run only over that directory. This solves the issue of the linter running over the entire project, causing roadblocks for a developer to merge their code due to finding issues unrelated to a developer’s changes. Where violations that are not related to a developer’s work could still be confusing is when a file that is currently breaking a rule is edited. Even though the current changes would not be related to the rule violation, the developer would not be able to merge their changes until they fix the violation since the violation is in the edited file.
DAS42 is a premier data and analytics consultancy with a modern point of view. We specialize in solving some of the most complex business challenges for the world’s most successful companies. As a Snowflake Elite Partner, DAS42 crafts customized strategies that create a single source of truth and enable enhanced and faster decision-making. DAS42 has a presence across the U.S. with primary offices in New York City and Denver. Connect with us at das42.com and stay updated on LinkedIn. Join us today on our journey to help you realize the possibilities of transforming your business through data and analytics.